Life in Lape Haven

Tag - Josiah

Simple Ways to Spark Joy in Your Children

Life in Lape Haven: Simple Ways to Spark Joy in Your Children. It doesn't take much to bring joy to our children's lives. Here are some ideas on simple ways to add some fun to your every day with your kids.

The other day I was gathering everything up and ready to head out the door to the grocery store with my two youngest boys when Josiah decided it would be a good time to ask Mommy for a cup of milk.

Since milk was already on the shopping list, and I was kind of in a rush, I grabbed our nearly-empty milk jug from the refrigerator and handed it to my 4-year-old.

“Here you go. Do you want to drink it straight from the jug?”

I figured there wasn’t much left in it, so we’d be throwing the empty container into the recycle box anyway. Plus, I wouldn’t have to get out a cup, and Josiah might have fun with this.

Oh, my goodness! His reaction was adorable.

He gave me a slightly surprised but very excited grin and nod, followed by the best giggle ever – It was equal parts delighted and ornery. Then he proudly chugged down his milk.

Life in Lape Haven: Simple Ways to Spark Joy in Your Children. It doesn't take much to bring joy to our children's lives. Here are some ideas on simple ways to add some fun to your every day with your kids.

My split-second decision, made primarily to save me time and hassle, brought my little guy so much joy that it got me thinking about all the simple, every day ways that we, as parents, can spark joy in our kids.

Life in Lape Haven: Simple Ways to Spark Joy in Your Children. It doesn't take much to bring joy to our children's lives. Here are some ideas on simple ways to add some fun to your every day with your kids.

Now, this isn’t about always giving your kids what they want or thinking that they have to be happy (or happy with you, Mom or Dad) all the time. We all know that our responsibility as their parents is to lovingly teach and train them, and they aren’t always going to be able to have fun or enjoy the process, especially when we have to discipline them.

But with all the hard work of parenting, there are rewards. One of the best parts about parenting, and one that you don’t hear enough about, is that Moms and Dads have the prime opportunity to show their children how to truly enjoy life and celebrate all the good things that God has given us. We get to help them embrace challenges and adventures and watch them grow through them. We are the ones who encourage them to try new things as we nurture and cultivate their senses of humor, their curiosity, and their imagination.

In short, we get to have fun with these little human beings!

And really, they make it easy. They have a natural, God-given desire to explore and discover, and they have an eye for seeing the wondrous and amazing in the common place, every day things around them.

So bringing them little moments of joy usually isn’t hard at all, like letting them drink straight from the milk jug once in a while (and with the understanding that we don’t do it unless we are finishing off the contents!)

HERE ARE SOME OTHER IDEAS FOR BRINGING JOY TO YOUR LITTLE ONES:

Life in Lape Haven: Simple Ways to Spark Joy in Your Children. It doesn't take much to bring joy to our children's lives. Here are some ideas on simple ways to add some fun to your every day with your kids.

(This post may contain affiliate links, which means that at no additional cost to you, I may receive a small commission when you use the links. See my full disclosure for details.)

Explore the World & Try New Things

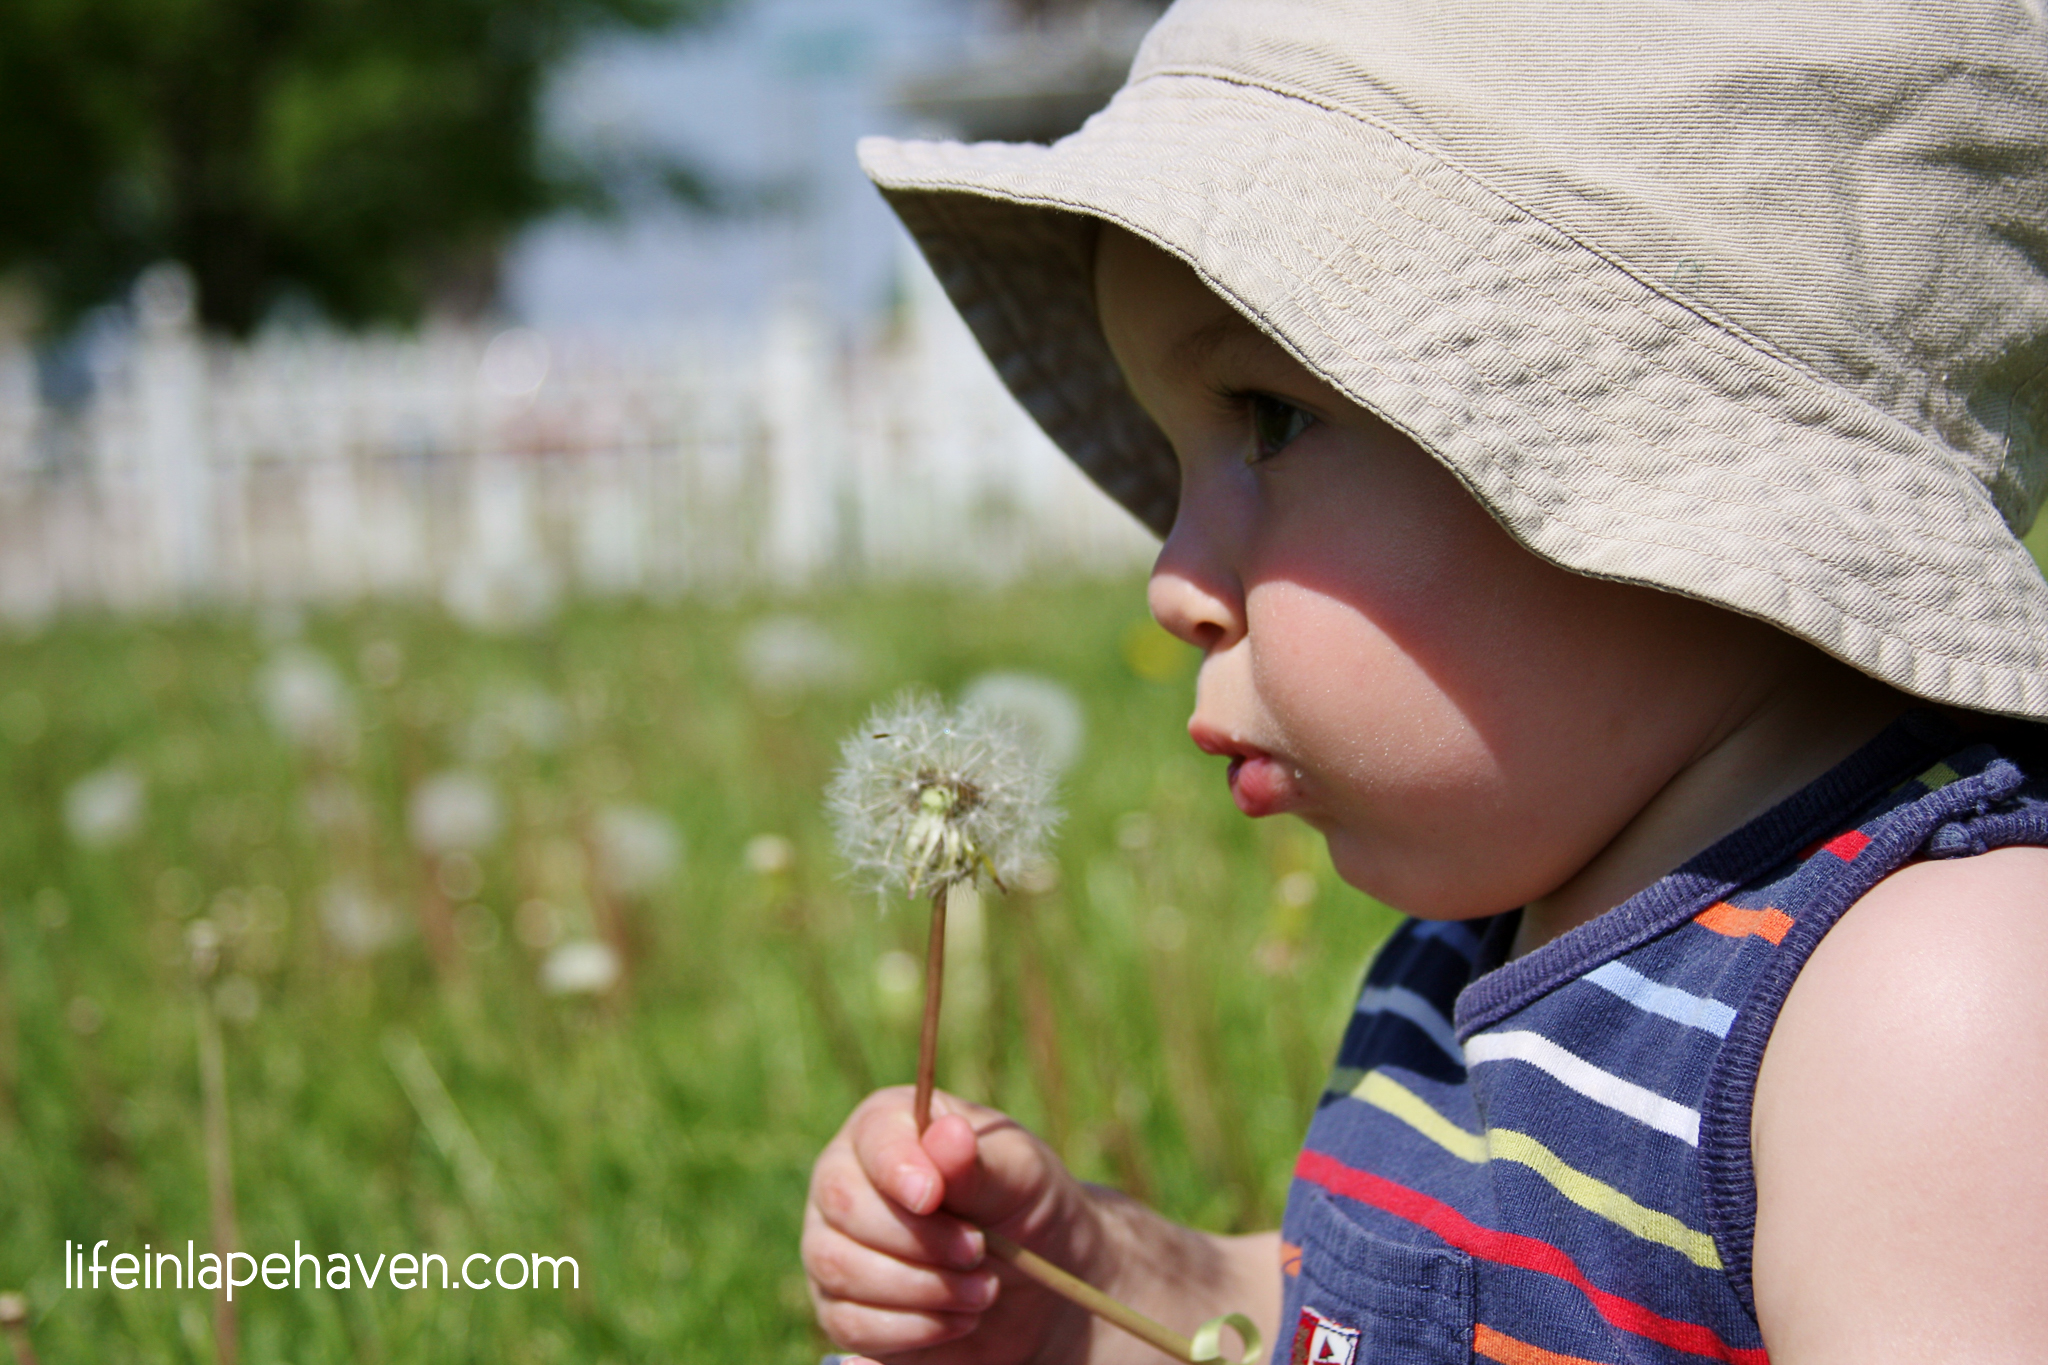
Let them blow those dandelion puff seeds. It’s just plain fun, and it would probably be good for you to pick a couple to blow on, too. You know you want to. (I’ve personally never outgrown it.)  Oh, and don’t worry about your lawn. Dandelions are good for the honey bees. 😉

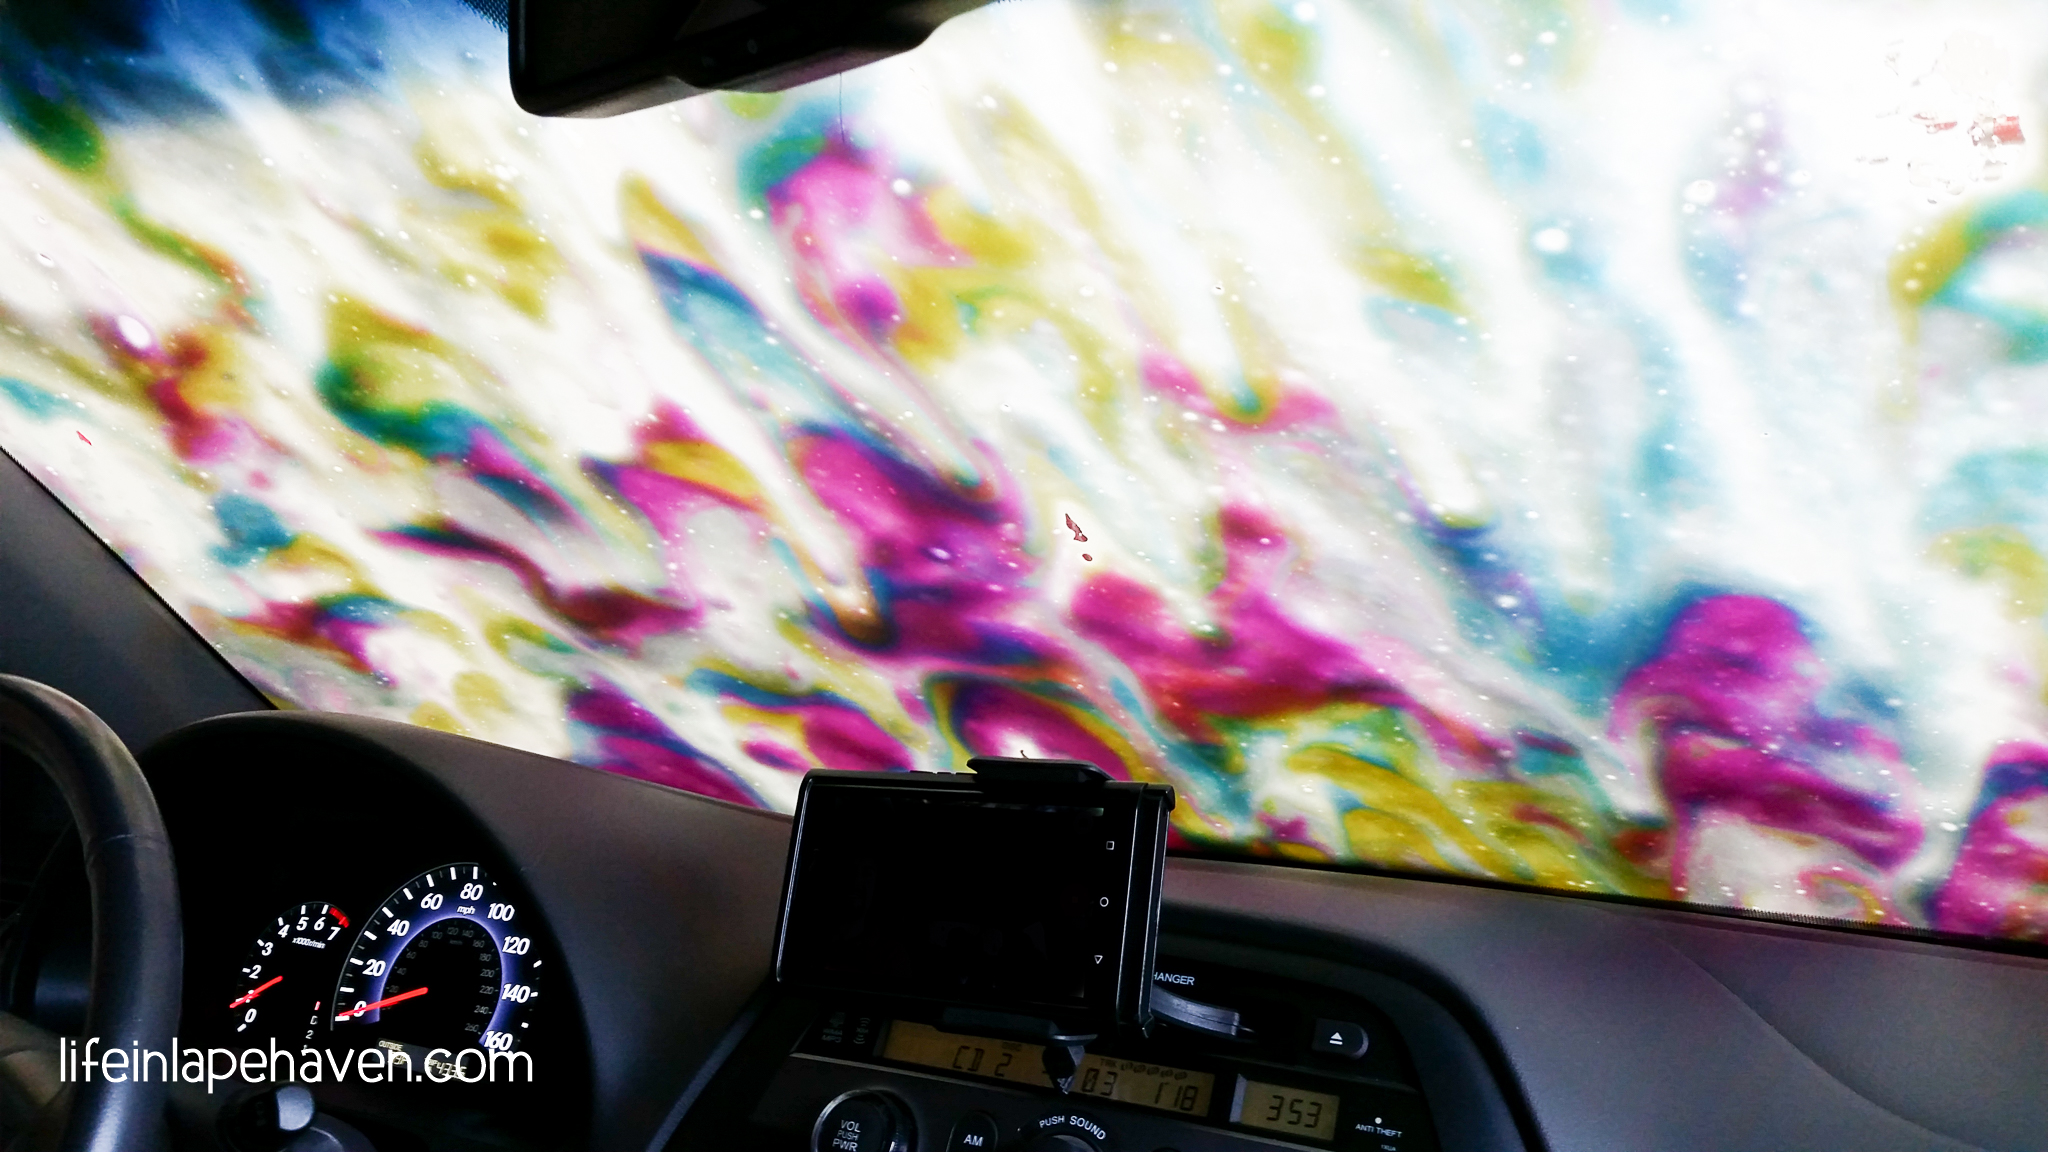
Go through the car wash. Seriously, my boys love this, especially when we go to the “big” one with the big rotating brushes and colorful foam. If you treat something as an adventure, little kids are generally pretty willing to play along.

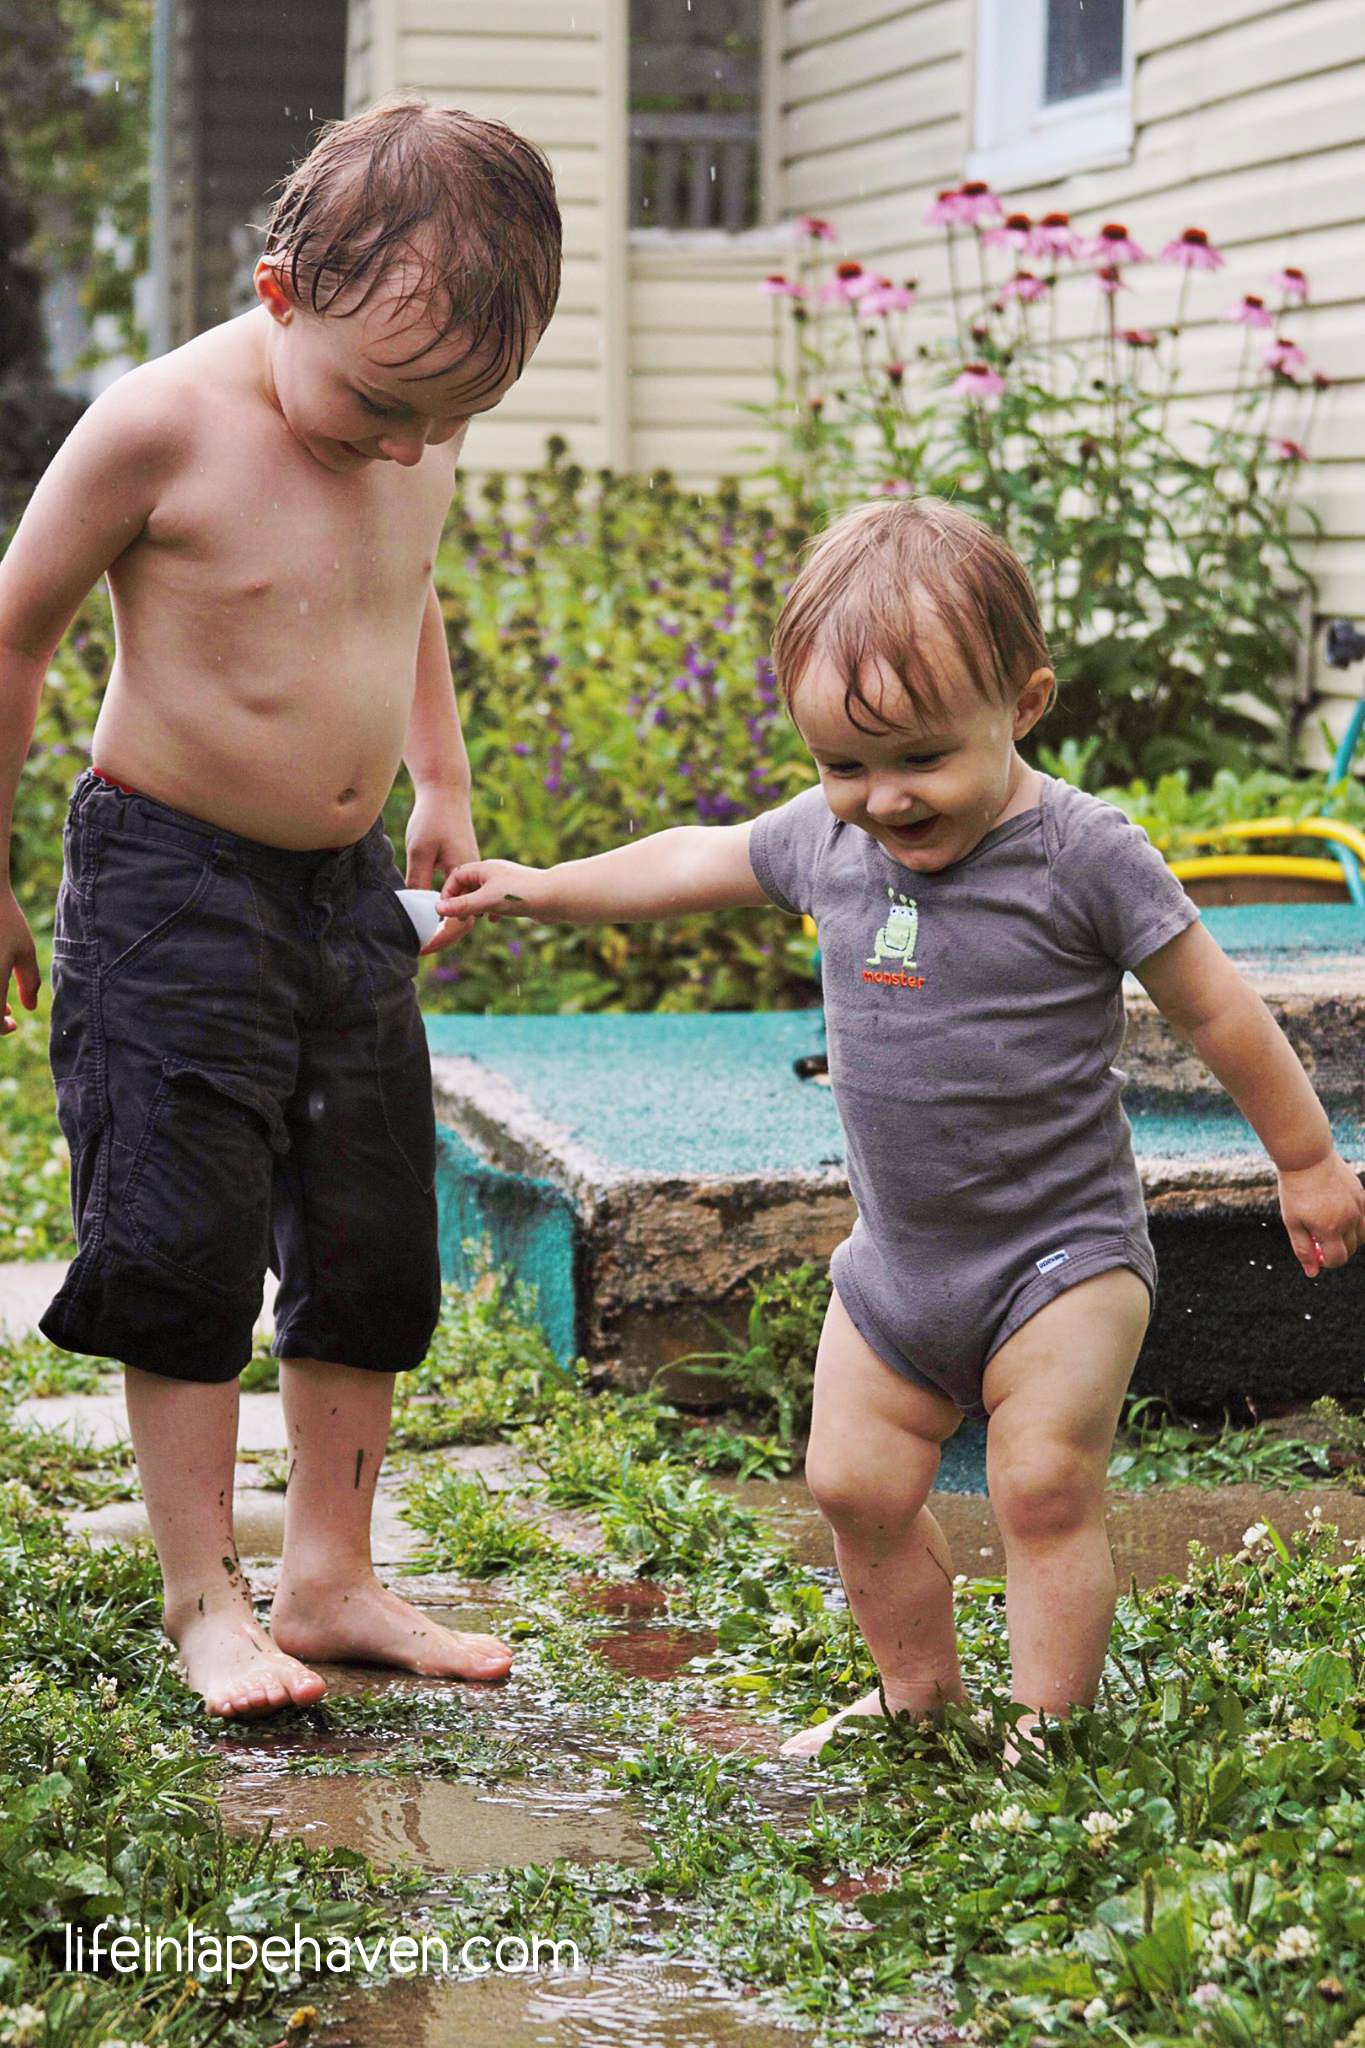
Also: Have picnics – even just in the backyard or in the middle of the living room, say “yes” to roly polies as pets, encourage them to play in the rain & puddles (when it’s safe, and they are suitably dressed)


Life in Lape Haven: Simple Ways to Spark Joy in Your Children. It doesn't take much to bring joy to our children's lives. Here are some ideas on simple ways to add some fun to your every day with your kids.

Give them the freedoms and independence that you can.

Allow them to pay at the store. Whether they are buying something with their birthday money, or you hand them the cash to give to the cashier during a grocery run, children feel rather grown up when they get to do “big people” things. They love that.

Similarly, giving little children the freedom to pick out their own clothes – and not making them change unless absolutely necessary – is guaranteed to bring them joy. It might just give you a laugh or two, as well. 🙂 Josiah adores “fun” socks, and I’ve learned to just forget about whether they actually match his clothes or not. Sometimes he does well; other times his outfits are awesome in a totally different way. (This also applies to shopping for clothes, too.)

Another “free to choose” thing that my boys love is when I give them the chance to pick what kind of cookies we’ll bake. And then they get to help me in the kitchen. Whether they are just dumping in the ingredients after I’ve measure them out, or Elijah is stirring oatmeal on the stove (supervised), letting kids lend a hand with meal (or goodie) prep is not only fun (forget the mess, make the memories), but it’s teaching them a valuable life skill.

Also: Let them eat that sugary cereal on occasion.

Life in Lape Haven: Simple Ways to Spark Joy in Your Children. It doesn't take much to bring joy to our children's lives. Here are some ideas on simple ways to add some fun to your every day with your kids.

Don’t Be Afraid to Be Silly

Have a spontaneous dance party. For us, that usually means while I’m doing dishes, folding laundry, or doing some other always-present household chore that I can do with a few turns, wiggles, and flourishes. I’ll turn on my Amazon Prime Music, and my boys will break out their moves. ( Try Amazon Music Unlimited 30-Day Free Trial)

Also: Go through the closets and create silly costumes. Or use old make-up (or Dollar Store finds) for face paint fun. Start a water gun / water balloon fight. Become the “tickle monster.”  Share jokes.


Be Creative

Give them the paper towel tube. Or an empty box. Some leftover scraps of fabric. My boys will fight over these things because they can use them to either pretend with or make a craft. Kids love to create, even if they don’t have an end product in mind, so give them things they can cut, paste, and color however they want.

Also: Show them how to play the spoons. Shoot video of them doing a pretend commercial or newscast or have them put on a theatrical production.

These are just some things that I know bring a smile to my boys’ faces, but you know your children best. Find out what puts a twinkle in their eyes, and do that.

And, yes, while some of these ideas probably won’t work as well when my guys get older, I think the same main principles will still apply. Hopefully by that time we’ve established a tradition of enjoying time together and being able to celebrate simple things as a family.

“As a family” is the key because if you notice, nearly everything on the list above requires your interaction or presence. Nothing will bring your children joy like spending time with Mommy and Daddy.

And I’m pretty sure that nothing will bring you greater joy than being with them, too!

WHAT SIMPLE THINGS GIVE YOUR LITTLE ONES JOY?

Get more ideas & encouragement from this real-life mom as I experience God’s faithfulness through the joy and chaos of motherhood.

Join my email list!  

YOU MAY ALSO LIKE:

Giving Him Apple Pieces to Put in the Pan

Saying Yes to a Roly Poly Pet

Going Naked at the Water Park

Choosing the Good Part

5 Tips & Tricks I’ve Learned with My 3rd Baby that I Wish I’d Known with My 1st

Life in Lape Haven: 5 Tips & Tricks I've Learned With My Third Baby that I Wished I'd Known with My First. Even though I've been a mother for nearly 7 years, I've learned a few new things with my third baby that would have been great to know years ago.
When Elijah was born nearly 7 years ago, Brad and I were the newbie parents, reading books and learning everything we could to help us adjust to life with our newborn little boy. When Josiah joined our crew a few years later, we were much more confident in our parenting roles and our experience, but we continued to learn as we parented two very active boys. By the time Isaiah came along a few months ago, we had plenty of tips and tricks up our sleeves, but as it turned out there were a few things that we’ve discovered since his December arrival that I wished we’d known way back at the beginning of our parenting journey.

Life in Lape Haven: 5 Tips & Tricks I've Learned With My Third Baby that I Wished I'd Known with My First. Even though I've been a mother for nearly 7 years, I've learned a few new things with my third baby that would have been great to know years ago.

This post contains affiliate links which means that, at no additional cost to you, I may receive a small commission if you use the link.

BABY BODYSUIT SHOULDERS ARE MADE THAT WAY FOR AN AWESOME REASON

Okay, actually this trick is something I’ve been holding onto for about two years or more. When I first saw videos and comments about it, Josiah was no longer wearing Onesies or other baby bodysuits, so Isaiah is the first child I’ve had a chance to try it out with. And you know what? It’s GENIUS!

You know how the baby bodysuits have those overlapping sections at the top of the shoulders (also called envelope or lapneck shoulder flaps)? I just thought that it was to be helpful for getting them over an infant’s head easily. While that is part of the reason, the biggest, most parent-life-changing reason is so that you can take the Onesie off of your child WITHOUT going over his head. You slip it off his shoulders and down his body.

Anyone who’s ever dealt with a diaper blowout knows the beauty of this method!

The very first time Isaiah wore a bodysuit, I took it off him this way, just to test it out. It was so much easier, especially with a wiggly, floppy newborn.

And not only was it easier to take off that way, we found that in those first few weeks, it was actually easier to put them on him from the feet up. This was incredibly helpful when I discovered that Isaiah’s little sleeper gowns with the elastic at the bottom had the same kind of shoulder flaps. Those go on much easier from the bottom up, too!

Life in Lape Haven: 5 Tips & Tricks I've Learned With My Third Baby that I Wished I'd Known with My First. Even though I've been a mother for nearly 7 years, I've learned a few new things with my third baby that would have been great to know years ago.

Here’s one of the videos I saw that show exactly how easy this method works.

Again, GENIUS!


HOW TO CALM A BABY

All babies cry. Since it’s their only way to communicate in the beginning, they do it a lot and fairly often. Knowing that is helpful, but knowing how to meet their needs and calm the crying is even better.

Like most parents, Brad and I had found a variety of soothing techniques with our little ones mostly by trial and error or happy happenstance. For example, when Josiah was tiny, he loved the sound of the dryer running. We discovered this one day when he was crying, and Brad was walking around with him, trying to settle him down. One step into the laundry room, and Josiah stopped crying. Stepping out of the laundry room, he would get fussy again.

When Isaiah was only a week or so old, I saw this video about how to calm a little one and immediately forwarded it to my husband. We were already using some of the techniques and tricks without knowing why they worked. But the order and the way that this man applied them was much more effective and rather amazing to see. (The video was part of a blog post with additional tips to calm a baby.)

Life in Lape Haven: 5 Tips & Tricks I've Learned With My Third Baby that I Wished I'd Known with My First. Even though I've been a mother for nearly 7 years, I've learned a few new things with my third baby that would have been great to know years ago.

In addition, there was another video that you may have seen popping up in your Facebook newsfeed over the last couple of years that showed a similar technique to calming a newborn, and it was an idea that I held onto to try out, too.

This method was demonstrated by a doctor as an almost immediate solution to calm a baby’s crying, and watching the video is rather impressive.

So, of course, we’ve had plenty of opportunity now to try some of the ideas with Isaiah, and they worked really well – so well that I wish we had seen these videos back when our first child was born.


THE POWER OF A GOOD SWADDLING SLEEP SACK

All of our boys have used some kind of swaddle or sleep sack, especially when they were first born. However, none of them have ever been particularly effective. The boys all did well at the hospital when swaddled tightly in a blanket, but at home we just couldn’t make our “baby burritos” as well as the nurses.

With Isaiah, we started out with the same sleep sacks and infant swaddlers we used with our older two boys and ended up with the same results: a slightly restless baby, which meant a very rest-less mommy and daddy. Because Isaiah was a bit smaller at birth than our other two, I thought maybe a slightly smaller sleep sack would help him, so I started looking online at all the options.

I decided on the HALO SleepSack Microfleece Swaddler because it not only came in smaller sizes, but also in a winter weight (my other two boys were spring babies, so they didn’t need a heavy sleep sack). The swaddle part of it was also adjustable to either have his hands completely in, partially in, or completely out, which proved to be exactly what we needed as he grew and developed over the first couple of months.

The first night he slept in his new sleep sack, the difference was obvious. It fit him well, he was warm enough, and it swaddled him just right. He was much less restless and slept better and longer than in the other sleep sack we had. I found myself wishing we had tried this sleep sack with our older two.

(This is one of the 10 items that have helped us adjust to life with a new baby.)

THE DIFFERENCE BETWEEN FOREMILK & HINDMILK

As a mom who has breastfed both of her previous babies for at least a year each, you would think I knew this one, and I did…sort of. However, when I was pregnant with Isaiah, I clicked through a few breastfeeding and nursing articles just as a refresher to help me prepare. While the one that I originally read is no longer available (the link doesn’t work), here are some of the articles that helped me.

Foremilk and Hindmilk – What does it mean?

The Good Milk

The Simple Picture that Put Me Back on the Road to Breastfeeding Success

Even reading over what I already knew was a fascinating reminder of how perfectly God created us to provide for our babies.


HOW TO BURP A BABY

No matter how you feed your baby, you’ll need to burp him. And I already knew how to burp a baby…only I didn’t. Of all the new things we’ve picked up this time around, this tip is BY FAR our favorite.

I saw this video posted by a blogger on Facebook, watched it, and thought, “That looks funny, but it makes sense. Interesting.” It also reminded me of the calming technique from that doctor’s video.

The day after we watched this burping technique, we were at Brad’s sister’s house for pictures and to visit the family since sickness in all our families had kind of postponed our holiday celebrations. When I tried out this burping method on Isaiah, we all noticed how it calmed him instantly. And I mean, instantly.

Life in Lape Haven: 5 Tips & Tricks I've Learned With My Third Baby that I Wished I'd Known with My First. Even though I've been a mother for nearly 7 years, I've learned a few new things with my third baby that would have been great to know years ago.

Calming Isaiah with the burping technique. (Photo courtesy of Picture Bliss Photography.)

My sister-in-law asked us if that was something we knew he liked, and I explained that we were just testing it out.

However, it quickly became our go-to for not just burping him, but just calming him down. Here’s how I shared about it on the Life in Lape Haven Facebook page the next week:

“UPDATE: OK, we’ve been doing this all weekend, and it SERIOUSLY works! Whenever Isaiah was fussy and we knew it was not from hunger or being sleepy, we did this. Just the goofy hold with the up & down alone calms him, then he usually burps and stays happy.”

It’s still working, and as he’s getting bigger, working us out, too!

WHAT ARE YOUR FAVORITE TIPS & TRICKS FOR TAKING CARE OF LITTLE ONES?


Get more ideas & encouragement from this real-life mom as I experience God’s faithfulness through the joy and chaos of motherhood.

Join my email list!  

YOU MAY ALSO LIKE:

10 Items that Helped Us Adjust to Life with a New Baby

4 Things that Helped Me Through 2 Unmedicated “Natural” Deliveries

The Most Annoying Pregnancy Symptom That I’d Never Heard Of


Feature picture courtesy of Picture Bliss Photography.

Tried It Tuesday: DIY Hand-Lettered Wooden Sign

Life in Lape Haven: Tried It Tuesday: DIY Hand-Lettered Wooden Sign. One of the projects I wanted to complete for decorating our boys' new combined room was this DIY Hand-Lettered Wooden Sign featuring a scripture that fits their "adventure" theme. Here's how I made this wall art at home.

Earlier this school year, right about the time we were making plans to move Josiah out of the nursery and into Elijah’s room, I got a text from Elijah’s teacher about his school work for the day. She was very excited about something he had written on one of his papers.

While she had attempted to send me a picture of it, it never came through, so it wasn’t until later in the afternoon, once Elijah got home, that I saw what had made her day and what she’d tried to let me know about.

Life in Lape Haven: Tried It Tuesday: DIY Hand-Lettered Wooden Sign. One of the projects I wanted to complete for decorating our boys' new combined room was this DIY Hand-Lettered Wooden Sign featuring a scripture that fits their "adventure" theme. Here's how I made this wall art at home.

Each day the students have to use their “Sight Word of the Day” in a sentence on their daily review sheet. That day’s word was “as.” Elijah’s sentence was: “As for me and my house, we will serve the Lord.”

I was pleasantly surprised. I didn’t even know that Elijah really knew that verse. I’m sure he’s heard it before, but I didn’t know he’d memorized it. However, I knew immediately where he’d most likely seen it most often: on the wooden sign in our living room over our pocket doors.

When I asked him, he just smiled and nodded.

While I want our boys to be encouraged and know the priority that we place on God’s Word in our lives, I hadn’t really thought about whether or not our boys were really noticing or remembering the scriptures or sayings they see hanging on the walls throughout our home. His schoolwork was a nice little reminder of how much our children notice the things around them every day and how important it is that some of those things speak to their spiritual growth.

With that in mind, I was determined to make sure that as we made “Elijah’s Room” into the “Big Boys’ Room,” that the first big project I completed was a wooden plank sign I’d already saved on Pinterest. It featured a scripture that fit perfectly with the “adventure” theme for their new combined room. It is a verse that will encourage them in their walk with God and His calling on their lives:

“Be alert and on your guard; stand firm in your faith. Act like men and be courageous; grow in strength!” – 1 Corinthians 16:13

Unfortunately pregnancy and life in general pushed this wooden sign project to the back burner for a bit, so I didn’t get to do it as soon as I’d originally hoped.

But over the past couple of weeks or so, I managed to work on it a little at a time, and TAH-DAH! It’s finally done and ready to hang up! (I knew I needed to get it done before Baby #3’s arrival, or it would have to wait even longer.)

So, how did I do it?

Well, it was easy…and it wasn’t. 🙂 Or rather, it was easy, but it was a bit more time-consuming than I’d expected because I had to change my approach a little after I started the project. However, I am still really happy with the results.

SUPPLIES:

Blank Wooden Sign (I got mine from Hobby Lobby with their weekly 40% off coupon)

Print Out of the Verse

Scissors

Tape

Ink Pen

Acrylic Craft Paint (I actually used some from my parents, so that saved money)

Paintbrush

Small plate or container for paint

Sealant (Rust-oleum Matte Clear Ultra Cover)

Hand sanitizer


INSTRUCTIONS:

1. PLAN – The first thing I did was type out the verse on my computer in different fonts and laid it out close to what I wanted it to look like on the board.

2. LAYOUT – Then it was a little bit of trial and error to find the right size that I needed it to be when I printed it out. I would print out the first couple of lines, cut out the words, and arrange them on the board. At first some lines were too big – too long for the board or too tall – so I had to play around with the font sizes and arrangement until everything fit neatly on the wooden sign.

Life in Lape Haven: Tried It Tuesday: DIY Hand-Lettered Wooden Sign. One of the projects I wanted to complete for decorating our boys' new combined room was this DIY Hand-Lettered Wooden Sign featuring a scripture that fits their "adventure" theme. Here's how I made this wall art at home.

3. TAPE – Once I had the layout as I wanted it, I taped each section to the board so the words wouldn’t move around.

4. TRACE – Using an ink pen, I traced over each letter, FIRMLY, leaving an indent of the word in the wood underneath. This took a little bit of time, especially since I chose a long verse and fonts that were more ornamental. I worked on tracing the words over a few different days, as I could find time to do it. (I made sure to peek at the “tracing” I was leaving on the wood. I didn’t want to be missing a section when I removed the print out)

5. PAINT – With all the words traced onto the wood, I was ready to paint. My original plan was to use a paint marker, which would have saved a lot of time. However, those require a much smoother surface than the wood provided, and the tip was way too wide for fine detail. It just didn’t work. So, I went with a paintbrush and some acrylic craft paint. (Thanks, Mom!)

Starting at the top, I peeled back the first section of words, but left it taped on the far side, just in case I needed to retrace a letter or something. Then, using a very fine-tipped paintbrush, I first traced the outline of the letter, then filled it in. Some parts of the wood were really easy to paint on, but other areas were rougher or had little divots or more obvious grain to them. But that’s part of working with actual wood. A smoother plank or surface would have made the painting easier, but I really wanted that rustic look of real wood.

Once I got a section painted, I removed the print out completely. Then I went on to the next section. The painting takes time and not having little boys bumping into the table constantly, so I could only work on it off and on. But a little here and a little there, and I managed to finish it all. 🙂

*FIXING MISTAKES – As I went along, a few slips of the paintbrush were inevitable, especially when the boys were running around in the kitchen as I worked on the sign at our table. However, thanks to all my work with various stains on the laundry, I knew that rubbing alcohol and hand sanitizer both work to get most paints out of things. So I kept a small bottle of hand sanitizer right by my paint. If a letter got uneven or I dropped my brush on the wood (it happened more than once), I used another paint brush with a little hand sanitizer on it to dissolve the mistake, carefully wiping it away with a paper towel.

6. SEAL IT – After the whole verse was painted on, and I was happy with it, I covered the whole sign with a matte clear sealing spray to protect all my work (spraying it outside, of course). I’m not sure that it’s entirely necessary, but since it’s going into the boys’ room, it can’t hurt to have a little extra protection against damage. 🙂

Life in Lape Haven: Tried It Tuesday: DIY Hand-Lettered Wooden Sign. One of the projects I wanted to complete for decorating our boys' new combined room was this DIY Hand-Lettered Wooden Sign featuring a scripture that fits their "adventure" theme. Here's how I made this wall art at home.

Is my wooden plank sign perfect? No. But it really wasn’t meant to be. It was hand-lettered, so imperfections are to be expected.

Will I be making more scripture or word art signs for our home? Probably. But not until after Baby #3 is here and a bit older (leaning over a baby bump as I traced and painted did NOT make the project easier). And next time, I think I’ll choose a shorter phrase and larger fonts. Haha.

Overall, this was a fun project, and I’m proud of it. Our boys were ecstatic when they saw the finished sign, and they can’t wait for it to be hung on their wall. Hopefully, the message on the wooden sign will find its way into their little warrior hearts and stay with them throughout all the adventures God has ahead of them.

YOU MIGHT ALSO LIKE:

How to Easily Create Beautiful Chalkboard Lettering

The Most Important Thing My Child Learned from His 1st Grade Teacher

Inexpensive Crafts that Make Great Christmas Gifts for Grandparents

Life in Lape Haven: Inexpensive Crafts that Make Great Christmas Gifts for Grandparents. We've made it a holiday tradition for our boys to make something special for their grandparents' Christmas gifts each year. These are some of our favorite DIY craft ideas.
Ever since Elijah’s second Christmas, when he was old enough to “help” a little, we’ve made it a holiday tradition to have the boys make something special for their grandparents’ Christmas gifts each year. We want our children to take an active part in giving, using their own talents and creativity and thinking about ways to bless someone else during the holidays. (We do give our parents additional gifts. These homemade items are just part of their Christmas.)

Thankfully both our boys enjoy crafty things and drawing, so they are usually pretty excited to help out and work on their “projects.” Of course, since they are children, Mommy has to be ready for lots of supervising, some mess (or a lot), and stepping back to give them room to actually do it themselves (as much as they can).  Their vision of the finished product might not always match mine, but if the Christmas gift is to be from THEM, it needs to be THEIRS. (And sometimes, younger kids, like Josiah, are more interested in the process than actually finishing the craft, which can try a parent’s patience.)

Over the last few years, we’ve made a number of different items, so I thought I’d share with you some of our favorite inexpensive, homemade Christmas gift ideas. (The title of each project has the link to more instructions.)

(This post may contain affiliate links, which means that at no additional cost to you, I may receive a small commission if you use the links.)

ORNAMENTS

Our boys love all the decorations at Christmastime, so making keepsake ornaments is one of their favorite things. They love seeing the ones they’ve made in the past on their grandparents’ Christmas trees and ours each year.

Salt Dough Ornaments: These were one of our first DIY gifts from Elijah. It was a relatively easy dough to mix up, if I remember correctly (it HAS been about 5 or 6 years). We rolled it out, then used a portion of it to make a couple prints of Elijah’s hand (because baby handprints are always adorable). We also cut out circle shapes for smaller ornaments and gift tags. Once the ornaments were baked, I had Elijah paint his handprint and draw designs on the circle ornaments, too. Then we added a nice ribbon to hang them with. (Note: The bigger the ornament, the heavier they will be, so roll them out as thinly as possible and keep them small).

Popsicle Stick Snowmen: Elijah has always loved snowmen, especially Frosty, so this was a really fun Christmas gift for him to make, and they turned out so adorable. I had the boys paint the sticks and help me glue them together, as well as adding the googly eyes. Then I painted the rest of the faces, including the noses.

Wooden Ornaments with Photos: This Christmas gift project was a bit more tedious than I expected, so the boys didn’t get to help as much. However, I was really pleased with how they turned out. The idea is to take a picture printed out on a laser printer and after coating a small piece of wood with gel medium, you glue the picture onto the wood, smoothing out all the bubbles. Once it has dried overnight, you use a sponge and water to remove the paper (the TEDIOUS part), leaving behind the print. I had to do the sponge and water step several times to get all the paper off (you can see it as little white specs and lines when the project dries). For our ornaments, we used differently shaped pieces of wood – rectangular, round, and heart-shaped (maybe 2”x 3”). Two of the pictures were ones that I took of the boys playing with the Christmas lights, and then I used a photo editor on my phone to add fun word art. Also, I used some pictures of them in the snow. I did some in color and some in black and white, and they all turned out nicely. (By the way, the link above is only to the Pinterest pin because the site is no longer active.)

While we didn’t make these for gifts, these homemade drum ornaments are super adorable.


PAINT SOMETHING

If we aren’t making ornaments, our projects tend to involve painting or drawing on something else. 🙂

Oven Gloves: Another “handprint” project was the “Grandma’s Helper” oven gloves that we did. I basically just bought some plain oven gloves, had the boys add their handprints on the front, and then wrote “Grandma’s Little Helper” or “Grandma’s Helping Hands” (something like that – haha.). They were really cute, though, and both grandmas were delighted with them.

Mugs: Since the grandmas got oven gloves, we wanted to do something for just the grandpas, too, so that year I had the boys paint on plain white mugs. There are tons of ways you do this, and I think the most popular seems to be to use Sharpie Markers. However, we didn’t. We did paint with a clear coat. I’m not sure how well they’ve held up through a dishwasher, but from what I’ve seen on other sites, there are ways to make them last a long time. (Note: We made sure to keep the paint and clear coat more toward the bottom half of the mugs. Also, the link above it NOT to the tutorial we used. Again, that tutorial is no longer available.)

Picture Frames: Another thing that the boys have painted as Christmas gifts was picture frames. We bought some plain black 4×6 frames, removed the glass, and let the boys paint designs on them. Then we put a nice family photo in it. Simple.

Blank Canvas: Elijah always wanted to do finger painting when he was little-little, so one Christmas, I simply bought a pack of blank canvases, and let him do his thing. They actually are quite neat. He made paintings for his grandparents and great-grandparents. He even had one left over for us, which is still hanging in our bedroom.


PICTURES

Okay, technically this isn’t a “craft,” but it’s always a good gift idea. I don’t know about your family, but my parents and in-laws always enjoy getting actual printed pictures of their grandchildren. While I try to get prints to them throughout the year, I know that many of the photo-printing sites offer coupons and great deals on not only prints, but other fun Christmas gifts around the holidays.

I always watch Shutterfly for their coupon codes for free 4×6 prints, but my two favorite coupon codes to get are either for free photo books or calendars. In the last couple of years, I’ve gotten at least two calendars each season for just the price of shipping. 🙂  You can personalize the calendars with multiple photo layouts and add important family dates, such as birthdays and anniversaries. This way the grandparents get to spend the whole year adoring their grandbabies.

Life in Lape Haven: Inexpensive Crafts that Make Great Christmas Gifts for Grandparents. We've made it a holiday tradition for our boys to make something special for their grandparents' Christmas gifts each year. These are some of our favorite DIY craft ideas.

I like to make the photo books into stories. 🙂


THIS YEAR

As of right now, I don’t know what project our boys will be working on for their grandparents’ Christmas gifts. Of course, even if I did, I couldn’t write about it, yet. 😉 With Baby #3 due mid-December, it will definitely have to be something simple that doesn’t require as much supervision from Mommy. Thankfully, they’ve had several years of practice at being crafty and creative for Christmas, and no matter what they do, as long as it’s from them, I’m pretty sure their grandparents will love it.

DO YOUR KIDS MAKE HOMEMADE CHRISTMAS GIFTS? WHAT HAS BEEN YOUR FAVORITE?


YOU MAY ALSO LIKE:

My Best Christmas Gift Idea Ever…So Far

Homemade “Little Drummer Boy” Drum Christmas Ornament

Why We Don’t Need MORE This Christmas

Why We Started Celebrating St. Nicholas Day

10 Ways to Help Your Kids Make Christmas More About Others

4 Things that Helped Me through 2 Unmedicated “Natural” Deliveries

Life in Lape Haven: 4 Things that Helped Me Through 2 Unmedicated Natural Deliveries. With my third child due soon, I've gotten lots of questions about my birth plan and my experiences with my previous two unmedicated natural deliveries. Here are the four things that got me through each birth.

As I get closer to my due date for our third child (we have about 7-8 weeks to go), it’s been impossible not to look back at my previous two deliveries as I prepare to face this one. In addition, I’ve gotten lots of questions, now and ever since my first child was born, about my experiences with unmedicated “natural” deliveries (meaning vaginal, not induced, no pain medications, as “naturally” as possible, no interventions, etc.).

While every pregnancy and delivery is different, I’ve found that there are some things that seem to remain the same. So, for all you soon-to-be mamas, especially you first-timers, or you hoping-to-be mamas, here are four of the most important things that helped me through my two deliveries.

Disclaimer: I know that as mothers, we have plenty of choices to make when it comes to labor and delivery, and not everyone chooses the same things. This post is not about one delivery method or choice being better than another. It’s just about how I handled my deliveries, and what I’ve learned through the process. However, I think these can apply to any labor and delivery situation.


1. Educate & Inform Yourself

When you’re a first-time mom, you have a lot to learn, and that’s fine. You’ve never been here before. Accept that challenge, and do your best to educate and inform yourself about this new chapter in life.

I think one of the most important and empowering things for me as a brand new mom-to-be was going into the delivery room with some knowledge of what was going on, what should happen, what could happen, and what my options would be.

I knew that I was by no means as educated or experienced as my doctor or nurses, so it was important that I trusted them for the big things. I also didn’t go overboard with learning or researching to the point of making myself fearful of every worst case scenario, but neither did I want to be completely clueless.

One of the most helpful resources for me came along before I was even pregnant. Early in our marriage, Brad and I just happened to come across the movie, “The Business of Being Born” on TV one night, and we watched it together. While at first it made me a little nervous about EVER having a baby, it gave me enough information on what God had created my body to do, what my expectations of labor and delivery should be, how medical interventions affected the process, and allowed me to see that I could have a say, to an extent, in how my babies entered the world.

Once I was pregnant with Elijah, I read a couple of pregnancy and baby books, including the cliché “What to Expect” books, usually week by week as my baby developed, and I subscribed to a couple of different websites geared toward mommies-to-be.

Life in Lape Haven: 4 Things that Helped Me Through 2 Unmedicated Natural Deliveries. With my third child due soon, I've gotten lots of questions about my birth plan and my experiences with my previous two unmedicated natural deliveries. Here are the four things that got me through each birth.

Brad and I also attended a one-day birthing class hosted by our hospital, as well as took the hospital tour once I reached my third trimester.

From all I had learned from researching and conversations with other mothers, I decided to, and was prepared to, deliver my baby without pain medications and as naturally as possible. Since Brad had shared in my learning, he knew why I made that choice, and he was 100 percent on board.

Oh, and one thing that I wish I had learned about before Elijah’s birth: perineal massage. That would have been helpful.

Actually, I saw a brief note about it about two weeks before he was due, but didn’t think much about it. However, Elijah’s head is larger than average, and unfortunately for me, that meant he got a little…um…stuck during delivery. It was only at that point that the doctor, who was not my regular OB/GYN, asked me if I’d done any perineal massage. No one had mentioned it to me at any time before, not even my doctor, so – no I hadn’t. And I ended up with a tear and stitches in places a lady should never have stitches, which made my recovery much more difficult.

And I KNOW the difference in recovery because, having learned my lesson with Elijah, I planned ahead, followed the instructions I found online, and was better prepared for Josiah’s arrival. Without the tearing and stitches, I bounced back amazingly easily after he was born.

So, yes, educating yourself and being informed is important. (See end of the post for additional resources)


2. Your Support Team & Good Nurses are Vital, but God Is Your Biggest Support

Another important detail on your delivery day is who will be surrounding you as you face labor and birth. You want people who will be your advocates, encouragers, and help you stay calm and as stress-free as possible. What you don’t want are people who question you on everything, give you too much sympathy, or make you feel weak or incapable. (You need to be a strong, confident warrior-mommy.)

For me it has always been my husband and my mother, one as my cheerleader and the other as my coach. (I’ve often said that my mom would make an excellent doula.) Both Brad and Mom were supportive of my desire to deliver as naturally as possible, and they did everything they could to help me in that. I know that I could not have made it through either boy’s delivery nearly as well without them both. (You can read a bit more about it in “8 of My Favorite Things about  Being Pregnant“)

Life in Lape Haven: 4 Things that Helped Me Through 2 Unmedicated Natural Deliveries. With my third child due soon, I've gotten lots of questions about my birth plan and my experiences with my previous two unmedicated natural deliveries. Here are the four things that got me through each birth.

In addition, I’ve always been blessed with wonderful nurses at the hospital where I deliver. During Elijah’s delivery, especially, when I had a doctor who was less than confident in my abilities and my determination to deliver without pain meds, it was imperative that I had supportive, helpful, kind nurses who weren’t condescending to me or my wish for a natural birth. One nurse in particular was amazing in how she helped me with my breathing through the worst of the final stages of labor.

However, despite being surrounded by a strong support team, there does come a point in delivery where it truly is just you and God bringing your baby into the world. He is the only One who knows that baby as well as you – better even. From the start of my pregnancies, we’d prayed for His presence and His hand on our babies, so when it came to the actual delivery, where else did I expect Him to be but with me? For me, delivering my children was a chance to trust God and rely on Him in  way I’d never done before.

So many times during contractions, I would pray and just focus on Him or hear a praise song in my head that would encourage me and remind me that I could do all things because God would give me the strength. Since He designed my body to carry and delivery babies, and He gave us this child, I could trust Him, more than anyone else, to help me through it.


3. It’s Only Pain

Yes. Labor hurts. It hurts, hurts, HURTS! And it’s work. It’s not fun. There is NO denying that. And making the choice to go without pain medication at all meant that I felt every bit of pain that labor and delivery could bring me from start to finish. It was part of my expectation (and yes, dread) of the day. You have to plan for and expect the pain. It’s going to be there.

However, it is pain with a purpose, a pain that will eventually pass, and a pain that ends with a precious baby. That’s what I reminded myself of as the contractions got intense.

And God has been gracious to us women, even in childbirth, in that as the pain builds, so does your tolerance. You may even doze between contractions at some point. You kind of get used to the pain, and then it increases. Then you get used to coping with that, and so on, until you think you can’t handle anymore. And then it’s time to push (OUCH!), and that pain motivates you to do whatever you need to to help that baby out. (Haha!)

There are so many ways to cope with the pain, but the biggest one is to remain calm, relax, and breathe. My deliveries were not marked by the crazy, overly dramatic moments seen on television shows or in movies – no flailing, screaming, or beating my husband.

In fact, with our first son’s birth, I was so calm when it was time to go to the hospital that my silly hubby didn’t believe I was actually ready to have the baby. In the car, he called his parents to let them know we were headed to the hospital, and he seriously told them, “Well, we’re going in, but I don’t think this is it.” (Okay, I MAY have smacked him THEN! After being up since 2am with contractions that increased throughout the day and were consistent with what the doctor said they should be, I KNEW that baby was coming that night.) Brad has since learned not to doubt me. 🙂

I also often reminded myself that if Abraham’s wife, Sarah, in the Bible, could be in her nineties and deliver a baby in the desert, I could certainly do it in my thirties and in a hospital with modern conveniences.


4. Flexibility Is Key

You have to go into your delivery knowing that there is a chance you’ll need to be flexible. Not so much physically flexible (although that might be helpful), but rather being ready to adjust your plans, vision, or expectations of what your birth experience will be.

Even though my births went fairly according to the book, we did have to make some adjustments even to how I coped with the pain (not every method works in every situation) or how we moved the delivery along (I did have to have them break my water with both deliveries, even though I waited as long as possible).

Clearly, I didn’t want stitches with Elijah. That was NOT in my birth plan. But it happened.

With Josiah, I experienced the “labor shakes,” something I’d never heard of until, yep, I was experiencing it. It was not pleasant and not ideal. Not being able to move around more – I like to be walking or up as much as possible – or control my breathing as well because my body was literally shaking from my feet clear up through my chest, made laboring much more difficult, and it was frustrating.

If you want to deliver your child without pain medication, know that it IS possible. It’s totally doable. You CAN do it, even when you have to adjust some things. Of course, if things come up, and everything changes on your plan, that’s okay, too. Do what’s best for you and the baby – always.

We had only minor adjustments, but they didn’t change the fact that my boys arrived safely and healthy, which was the most important part of our plan.

Life in Lape Haven: 4 Things that Helped Me Through 2 Unmedicated Natural Deliveries. With my third child due soon, I've gotten lots of questions about my birth plan and my experiences with my previous two unmedicated natural deliveries. Here are the four things that got me through each birth.

So there you go. That’s how I delivered two beautiful babies as naturally as possible and completely medication-free: being educated, surrounding myself with supportive people, expecting and planning for the pain, and being flexible.

It’s how I plan to bring this third little guy into the world soon. 🙂


While I haven’t gone through my third labor yet, here’s what’s been the best thing for helping me through this third pregnancy and all it’s discomforts.

UPDATE: Want to know how my third labor went? Here’s Isaiah’s birth story – It was a birth story that didn’t quite go according to my plan.

Since I recommend being educated as part of your labor and delivery preparation, I asked a community of online moms for the best resources for a mom wanting an unmedicated, natural birth experience. Below are some of their most popular answers.  (Some of the links below may be affiliate links, which mean that at no additional cost to you, I may receive a small commission when you use the links.) 

Ina May’s Guide to Childbirth by Ina May Gaskin (Ina May is one of the midwives featured on the above-mentioned documentary, “The Business of Being Born.”)

Husband-Coached Childbirth: The Bradley Method of Natural Childbirth by Robert Bradley, MD.

Natural Childbirth the Bradley Way by Susan McCutcheon

BradleyBirth.com (You can find local Bradley method birthing classes)

Redeeming Childbirth: Experiencing His Presence in Pregnancy, Labor, Childbirth, and Beyond by Angie Tolpin, plus RedeemingChildbirth.com (has free resources) and CourageousMom.com

The Birth Book: Everything You Need to Know to Have a Safe and Satisfying Birth by William Sears, MD, and Martha Sears, RN

BirthBootCamp.com

Birth Without Fear Facebook community


YOU MIGHT ALSO LIKE:

Welcoming Isaiah: A Birth Story that Didn’t Quite Follow My Birth Plan

5 Tips & Tricks I’ve Learned with My 3rd Baby That I Wish I’d Known With My First

10 Items That Helped Us Adjust to Life with a New Baby

The Laundry Sorting “Game”

The Laundry Sorting Game

Now that Elijah is back in school, I am Josiah’s primary playmate, which means I’m back to doing housework with my little tag-along. While he does play well by himself when I need him to, I like involving my children in various household chores and letting them learn how to help around the home.

The other day Josiah wanted to play a game with me while I was trying to get the laundry gathered and ready to wash. Glancing down at his Candy Land game spread out on the floor, I got an idea.

Life in Lape Haven: The Laundry Sorting Game. When my preschooler wanted to play a game, but I needed to get laundry done, I came up with a new game that helps my son learn his color, matching, and an important life skill - all in one.

“How would you like to play a game to help me sort the laundry,” I asked him.

“A game? Yeah!” was his reply.

I told him that I’d need to borrow some of the color cards from his game, and he eagerly handed me the ones I wanted. Then we headed off to the laundry room for our exciting new “game.”

With all the clothes piled to one side or still in the hamper, I set three empty laundry baskets on the floor, then proceeded to set different color cards in front of them.

Life in Lape Haven: The Laundry Sorting Game. When my preschooler wanted to play a game, but I needed to get laundry done, I came up with a new game that helps my son learn his color, matching, and an important life skill - all in one.

I explained to Josiah that his job was to match the clothes with the right baskets, sorting them by the color cards in front of each one. (Since Candy Land doesn’t have a white or black card, I grabbed an index card from the kitchen, cut it in half, and drew a white square and black square. I also doodled out a towel, washcloth, pair of socks, and a pair of underwear to place with the “White” basket, too. Josiah especially liked the underwear picture. Boys.)

Life in Lape Haven: The Laundry Sorting Game. When my preschooler wanted to play a game, but I needed to get laundry done, I came up with a new game that helps my son learn his color, matching, and an important life skill - all in one.

Our three baskets were: Darks (blacks, blues, & greens), Reds (reds, oranges, and yellows), and Whites & Linens (light colors, towels, washcloths, most socks, and underwear).

(I know that some people sort their laundry differently or not at all, but this was a simple system that he could follow, and I could easily adjust if needed.)

Once everything was set up and understood, he stood in the middle of baskets, near the pile of clothes, and with a “1-2-3-Go!” he started sorting things in to the corresponding basket. He had so much fun matching the colors and showing me where each item went that he was done in no time with little help from me. (I did some sorting, too, rather than just be a slacker and leave it all to my 3-year-old. Haha.)

Life in Lape Haven: The Laundry Sorting Game. When my preschooler wanted to play a game, but I needed to get laundry done, I came up with a new game that helps my son learn his color, matching, and an important life skill - all in one.

When he was all done, I gave him a high five and let him help me load the washer with the first basket of clothes. Then he went back to happily playing Candy Land (not sure how he plays it by himself, but he was content so I left it alone.)

Since the “game” worked so well, and since I know that in the coming months of my pregnancy, leaning over and bending will be a little more difficult, I decided to work up a better sorting guide for my little helper to use next time.  It is a great way to reinforce his basic skills of color recognition and matching, plus he’s learning an important life skill and helping Mommy out at the same time. Win-win-win!

Life in Lape Haven: The Laundry Sorting Game. When my preschooler wanted to play a game, but I needed to get laundry done, I came up with a new game that helps my son learn his color, matching, and an important life skill - all in one.

I’m also sharing this guide with you. You can download a free printable of the “Laundry Sorting ‘Game’” to play with your little ones. Just cut out the sections to label your sorting baskets. (Or use the basic idea and tweak it to fit your laundry sorting routine.) The socks and underwear icons on the printable are courtesy of MediaLoot.

And just in your case your kids are a little older, don’t worry. When Elijah saw me working on the guide, he just read “The Laundry Sorting ‘Game’” and asked if we could play it! Hahaha. Sadly, I didn’t have any laundry that needed sorted at the time, but I’ll be sure to include him the next time we…um… “play.”

(While we’re talking laundry, you might want to check out my other laundry-themed posts:

How to Get Grease Stains (Even Set-In Ones) Out,

How to Get Grass Stains Out of Clothes,

How to Get Dry Erase Marker Out of Jeans, and

A Ridiculously Simple Way to Get Silly Putty Out of Fabric .)


Get more ideas & encouragement from this real-life mom as I experience God’s faithfulness through the joy and chaos of motherhood.

Join my email list!