Life in Lape Haven

Category - Tried It Tuesday

Zucchini Pizza in a Pot

Life in Lape Haven: Tried It Tuesday - Zucchini Pizza in a Pot

I love having a garden. Being able to go outside and pick what you’ll have for dinner is awesome and so fun. However, when everything comes on at once, it can be tricky to eat it all up before it goes bad.

This year, hubby, our boys, and I planted a small garden with cucumbers, tomatoes, zucchini, and yellow summer squash. Our zucchini and summer squash plants were initially feeding the local rabbits, but once we blocked the plants off with chicken wire, we’ve managed to harvest a few vegetables from each plant.

My parents’ garden, however, has flourished with zucchini and squash, so with all that they’ve grown and our own garden’s contribution, we have quite a bit to use up between us.

Life in Lape Haven: Tried It Tuesday - Zucchini Pizza in a Pot

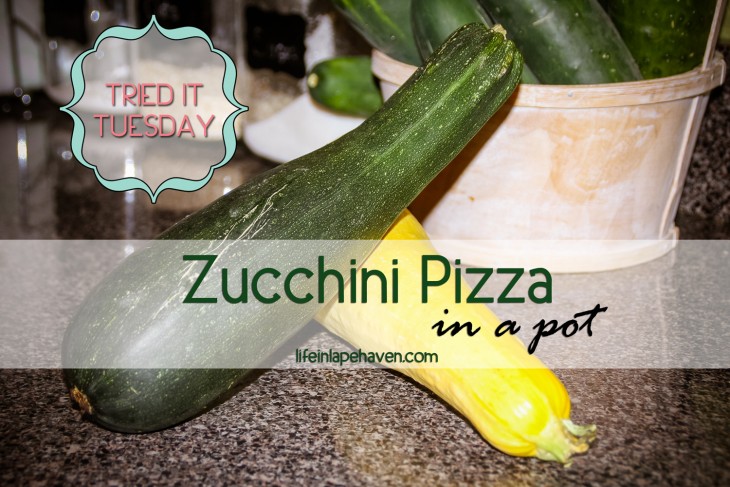
For my family, the go-to recipe for zucchini and/or squash has been zucchini pizzas. (In case you don’t know, zucchini pizzas are made by slicing the zucchini into thick rounds or cutting it in half as “boats” or planks, then topping it with pizza sauce, pepperoni, cheese, and whatever other pizza toppings you want, and baking it.) It’s so yummy, and it gets my guys to eat their veggies.

Well, at least two of my three guys will eat their zucchini or squash. Josiah, who’s 2, just pulls off the toppings and eats those, leaving the sad little zucchini “crust” all alone on his plate.

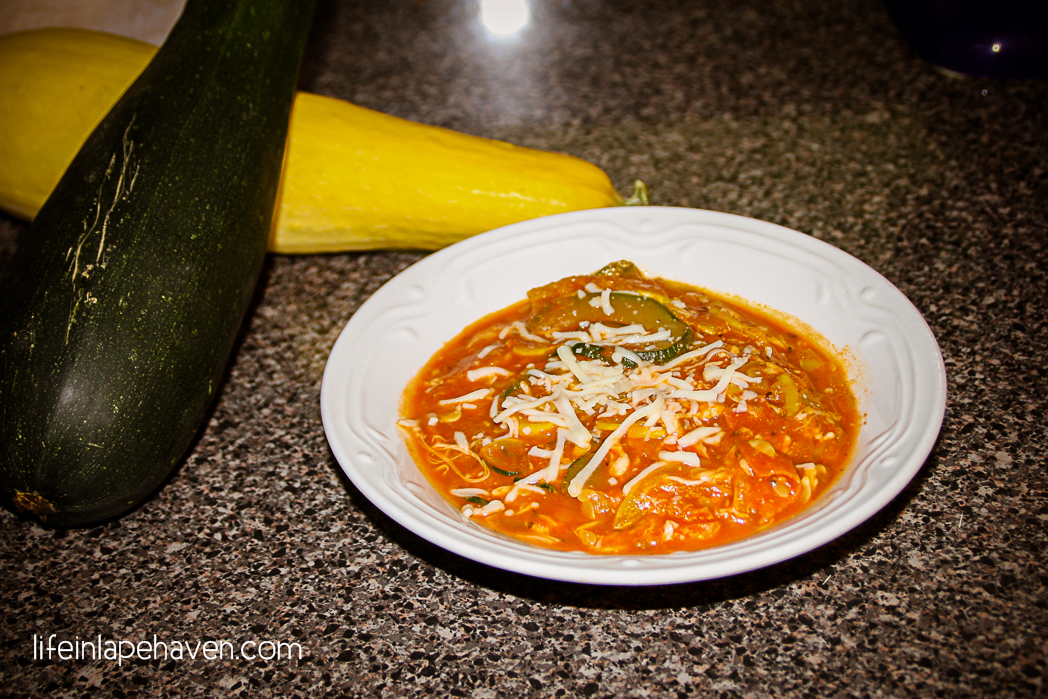
So last week, as I stared down at a zucchini and squash that needed to be cooked, I had an idea and decided to try it out.

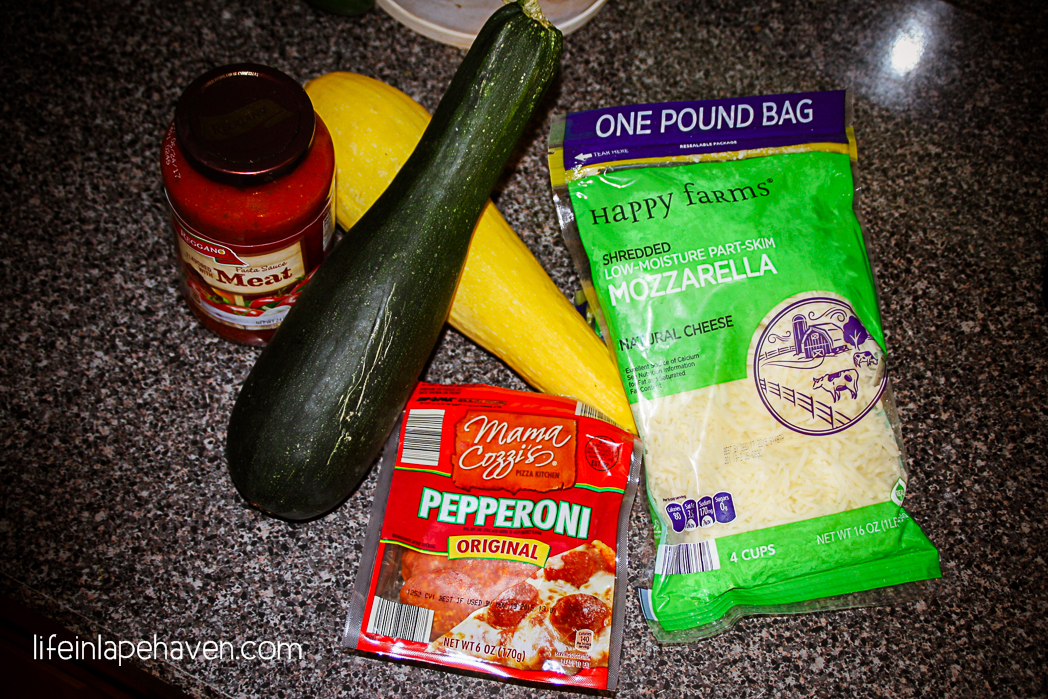
Since there wasn’t enough there to make zucchini pizzas for everyone, I decided to slice them both very thinly then cook it in a pot, adding the sauce and pizza toppings at the end to create the flavors of zucchini pizza, but all mixed together. I hoped this would serve two purposes: it would stretch what I had to work with and maybe, just maybe, Josiah would eat it better.

It was super quick and easy to throw together, and the end result was tasty, just like zucchini pizza, only saucier, which my guys loved.

My experiment worked, at least on one count. It definitely made enough to feed us all. Josiah, however, was not convinced. He actually sat there and picked the toppings out, bit by bit, leaving strips of zucchini and squash behind. *Sigh*

Brad and Elijah loved it, so it has become a new go-to zucchini recipe for us. Since I know we’re not the only ones with an over-abundance of zucchini and squash right now, I thought I’d share my little thrown-together, quick and easy, one-pot meal recipe with you all.

Life in Lape Haven: Tried It Tuesday - Zucchini Pizza in a Pot

Just a note: Feel free to tweak the ingredients to your family’s liking. If I were making this just for myself, I’d use less sauce (maybe even half as much), but my guys love some pasta sauce. (Ours is almost a zucchini pizza soup. Haha) You can add more or less pepperoni and cheese and add whatever other pizza toppings you have on hand.

If you try it out, let me know how it goes over with your crew and if you were able to sneak it past any picky eaters with better luck than I had!

Tried It Tuesday: Blueberry Hand Pies

Life in Lape Haven: Tried It Tuesday - Blueberry Hand Pies collage

My hubby calls me nearly every day on his way home from work. (It’s something we started when we were dating…aww) Inevitably, after an update on the boys and how our day went, he’ll ask, “What’s for dinner?” He knows that he’s in for a surprise when I reply with, “I’m concocting.”

“Concocting,” for me, means that I’m not just following a recipe. I might have one that I’m referencing, but I’m not sticking to it too closely, either because I’m making substitutions for certain ingredients or because I’m improving. Usually I’ll end up with two or three different recipes for a certain dish that I pull from, and the resulting effort is bits and pieces of them all.

I know – It sounds scary. However, you can ask Brad, and he’ll tell you that I have yet to make something horrible or totally inedible. (I’m not a food expert, but I do watch Food Network on TV.) I’ve made some okay meals this way and some super fantastic meals this way.

So when I found myself with a couple of pints of blueberries that I needed to use up quickly (they were on sale, and my boys love them, but they don’t have a long shelf life), I started looking for a new recipe that I could use them in.

Life in Lape Haven: Tried It Tuesday - Blueberry Hand Pies, Bowl of Blueberries

Having recently added this rather yummy recipe for beef empanadas to my repertoire, I was curious about using the dough from it for blueberry “pie pockets” or hand pies. Of course, I wasn’t going to use the beef filling with my blueberries, so I needed a good blueberry pie filling. After searching for a while, I found a simple one and adapted it for what I wanted.

The results were delicious, and those little pies were gone within two days. The tweaked recipe mash-up has become a new favorite around our house, and I’m going to share it with you today.

Now I will say that the pie dough is not your average flaky pie crust. You could use any pie crust recipe or even store-bought crust with this filling. The reason I didn’t is because I like the flavor of this dough and its elasticity. I don’t have a problem with it tearing or breaking apart, and I can fill each pocket pretty full. Also, you can always change up the filling. Do your own concocting, and make it an adventure!


Tried It Tuesday: Stitch Fix

Life in Lape Haven: Tried It Tuesday - Stitch Fix box

Last year on my birthday, my hubby signed me up for a Stitch Fix account.

In case you haven’t heard of them, Stitch Fix is an online clothing subscription where you fill out information on your style and sizing, and their stylists send you 5 pieces of clothing to try on based on your information and requests. Each time you receive a box, you are charged a $20 styling fee, but if you keep an item or two or all of them, the $20 goes toward the purchase. You have 3 days to try on the pieces and decide which you want to keep and which you want to return. When you decide, you go to your profile and check-out. Then you drop the stuff you want to return into the provided envelope and mail it back for free (free-ish if you didn’t keep anything). They ask you at check-out what you like or don’t like about each item, so the next box is even more tailored to you.

I had heard about Stitch Fix off and on and was anxious to see what it was all about. Filling out my styling information was fun and easy and setting up a delivery for my first box was pretty exciting. I decided to set mine up to come every other month initially.

When my first “Fix” came, it was like Christmas. My boys were nearly as eager as I was to see what was in the box. I was pleased with what I received, even though there were a few sizing and style issues. However, given that it was my very first box, I was satisfied that I liked two of the pieces enough to consider keeping them. Then I had to decide if I liked them enough to pay for them (most pieces I’ve received are around $40-$60 each) or not enough and lose $20. I ended up keeping a navy striped long-sleeved shirt, and I’ve worn it often since. (Don’t pay attention to me in the pics – late evening photo session after a long day).

Life in Lape Haven: Tried It Tuesday - Stitch Fix - Navy Striped top

My second “Fix” came close to the actual Christmas, and I was really happy with how well the stylist did in picking things to send me with just the little feedback from my previous box. The fit on all the items was great (4 tops, 1 pair of paints), but some I liked better than others for various reasons – comfort, personal taste, and so on. Being so close to Christmas, I wasn’t willing to pay to keep every piece (which is usually at least $200 even with the “buy all 5 pieces” discount of 25%). I ended up keeping a purple shirt with Dolman sleeves, which again has seen a lot of wear.

With my second box, I posted pictures on my Facebook for friends to help me decide which pieces I should keep, and through that was able to get a referral credit to my account when someone signed up for their own Stitch Fix to be delivered. That went to my third box. (Anytime someone signs up through your referral link, like the one I have in this post, you get a $20 credit when their order ships. It makes continuing to use the service a lot more feasible for me.)

My third box was, again, a good mix of the right fit and style. I kept a cute sweater from that Fix. However, with the change of seasons, I found that I had a sufficient wardrobe to see me through spring and summer, so I put my deliveries on hold for a while.

Life in Lape Haven: Tried It Tuesday - Stitch Fix - Purple shirt with dolman sleeves

Overall I’ve had a pleasant experience with Stitch Fix. For me, it’s fun trying things this way and easier than having to drag two little boys and a big boy through a department store or two and several trips to the dressing room. (Dressing rooms and 2-year-olds do not work well together!) Hubby says that he looks at the stylist fee as saving him from having to go shopping all day. I think the $20 just helps make it easier to justify keeping at least one thing from every Fix.

I’ve also found that I’ve tried and liked different styles than what I would pick out for myself sometimes. And I always get compliments on the pieces I’ve purchased. (Glad to know that being home all day with two boys hasn’t completely eroded my slight sense of style! Haha) Stitch Fix also send little cards with how to style each piece they send, which helps give you the courage to try something new.

Life in Lape Haven: Tried It Tuesday - Stitch Fix, style card

Besides the fun, convenience, and style, I’ve found that having a nearly guaranteed good fit on each piece I’ve tried on is wonderful. The survey you fill out when you set up your account is so detailed that they know exactly what pieces to send you. I’d have to walk all over the mall and spend hours trying on clothes to get 5 pieces that fit me as well as my last box did.

So far, the quality of the pieces has been good. All three of mine are hand-wash only, though, so that may help (It’s not my favorite way to have do laundry and definitely a slight negative when I think of what I’d like to keep from a Fix).Since the quality and fit have been better, the higher price has been worth it for me, even though I still can’t bring myself to spend a huge chunk of money to keep all 5 yet. I’d have to love each piece a lot for that to happen.

If you haven’t tried Stitch Fix, I think it’s definitely worth ordering a box or two, just for the fun of trying on stylish clothes in the comfort of your home. You can check them out here. If you have received a Fix, let me know about your experience.

Life in Lape Haven: Tried It Tuesday - Stitch Fix - Collage of Stitch fix pieces

Tried It Tuesday: 2-Ingredient Tub & Shower Cleaner

Tried It Tuesday: Tub & Shower Cleaner

About three years ago, we had to redo our entire bathroom due to a leak. (Ok, actually we only HAD to replace the tub and surround and flooring, but we CHOSE to update the sink, vanity, mirror, and toilet at the same time.) We put in a new tub and surround and finished it off with beautiful oil-rubbed bronze fixtures. Since everything was being redone, we put bronze fixtures on the sink as well. It was so pretty and pulled together.

Within a few weeks’ time, I was regretting the bronze fixtures. They were not the easiest things to clean. Then I started noticing calcium build-up from our water on the shower curtain, fixtures, and I could even feel it on the shower walls, despite the fact that I was cleaning them all as recommended with “gentle cleaners.”

So for the last few years, I have hated cleaning our bathroom. I do it, but I have dreaded it every time. It feels like wasted effort when you clean, and then what you cleaned (and tried really hard to clean well) doesn’t look or feel clean. Ugh.

And I tried all kind of cleaners, techniques, and ideas. Nothing worked well and easily. If it worked decently, it took forever and wore me out. If it was easy, it didn’t really do the job.

Then, hallelujah! I found a new idea to try in late February this year. Scrolling through my Pinterest feed, I saw a recipe for what some called a soap-scum remover and others named it a shower cleaner that only required vinegar and Dawn dish detergent, the two darlings of homemade cleaners. Since I’d been using vinegar to get some of the calcium deposits off, I was intrigued. When I read the directions that made it seem rather simple and easy, I was ready to try it out.

Tried It Tuesday: Tub & Shower Cleaner

I heated ½ cup of white vinegar in the microwave (about a minute or so), poured it into a spray bottle, added ½ cup of dish detergent (I didn’t have Dawn on hand, so I used my generic-version of Dawn), and swirled the bottle to mix the ingredients. Then I sprayed down my entire shower surround, tub, fixtures, and even the shower curtain. Following the instructions, I left it alone for 2 hours…and then some. I had lunch to make, kids to wrangle, and then it was time for naps.

Tried It Tuesday: Tub & Shower Cleaner

So, a bit over 2 hours later, I went back in with a damp kitchen cloth (it has some texture to it), took a swipe at the bathtub ring, and the results: AMAZING.

I actually stood back in shock.

The yucky stuff had wiped right off! I was staring at clean, shiny tub! Excited and inspired by the first result, I went to work wiping down and rinsing the rest of the tub. I did have to slightly scrub at a few places that were more built-up, but even those were easy compared to my previous cleaning attempts.

Tried It Tuesday: Tub & Shower Cleaner

This worked so well, even on the bronze fixtures, that I was HAPPY to be cleaning.

Wait…what?!?

Yep. Happy to finally be able to really get my bathroom clean and sparkling without stinky chemicals or hours of scouring.

I have been using this recipe ever since. Always works like a charm.

Tried It Tuesday: Tub & Shower Cleaner

One warning, though: Hot vinegar is potent. Whew! When I spray this in the shower, I do it quickly and hold my breath. It will make your bathroom smell like vinegar during those two hours you leave it on there, but once you’ve rinsed it off, your bathroom will just smell clean, which is exactly what you want.

Tried It Tuesday: Tub & Shower Cleaner

2-Ingredient Tub & Shower Cleaner

½ cup Vinegar

½ cup Dawn (or equivalent dish detergent)

Spray Bottle

Heat vinegar in microwave for a minute to a minute-and-a-half. Pour into spray bottle. (I use a funnel to limit the mess). Add ½ of dish detergent. Put the spray nozzle on, and swirl the bottle to mix the ingredients. Spray tub, shower, or fixtures. Leave it alone for 2 hours. Wipe off with a damp cloth and rinse area clean. Rejoice over an easily cleaned bathroom.


YOU MAY ALSO LIKE:

How to Get Grease Stains (Even Set In Ones) Out of Clothes

The Laundry Sorting Game

A Ridiculously Simple Way to Get Silly Putty Out of Fabric


Tried It Tuesday: Homemade Sidewalk Paint

Tried It Tuesday - Homemade SIdewalk Paint. This easy DIY homemade sidewalk chalk paint is a great way to get your kids outside and creating some adorable masterpieces. Made with ingredients you already have in your cabinet!

With the rain finally staying away and allowing us to have some summer sun, the boys want to be outside constantly, and being energetic, curious, creative boys, they are always looking for something different to get into, especially if it’s messy.

Yesterday, we satisfied that mess-loving, outdoor-play need with a little homemade sidewalk painting.

Tried It Tuesday - Homemade SIdewalk Paint. This easy DIY homemade sidewalk chalk paint is a great way to get your kids outside and creating some adorable masterpieces. Made with ingredients you already have in your cabinet!

We’ve actually tried this once before, so I knew it would be a hit. Elijah is our resident artist, so anything crafty or involving drawing or coloring, he’s there. Josiah is not quite as artistic, but he’s starting to enjoy drawing simple things, like circles and his interpretation of faces and “writing” letters.

If nothing else, I knew they would both have fun getting messy. Because that will happen. It did last time, so I fully expected it this time.

I was not disappointed, and neither were they.

Tried It Tuesday: Homemade Sidewalk Paint

Whipping up a batch of sidewalk paint is really easy:

SIDEWALK PAINT

1 part cornstarch

1 part water

Food coloring


I actually used 1½ cups each of water and cornstarch, mixing them thoroughly together in a large spouted bowl, then poured the slurry into a couple of my muffin tins.

I’ve found it’s a good idea to fill every other cup of the tin because little guys will slop colors around, and if they are all side-by-side, you’ll end up with murky brownish colors in every cup really quickly. I filled each cup about halfway full and ended up with at least 10 cups to paint from.

When we added food coloring to the half-filled cups of the muffin tin, we mixed up a rainbow of colors, plus black (all colors) and brown (red, yellow, & green), and we left a couple of them white.

All that’s left to do is get painting.

Tried It Tuesday: Homemade Sidewalk Paint

Tried It Tuesday: Homemade Sidewalk Paint - Painting

We started out using foam brushes, which work really nicely on the smooth concrete by our fish pond (The foam can get a little mangled when used on the rougher sidewalks if you aren’t careful).

The paint dries the brightest if you paint slowly and let portions somewhat dry before adding a new color, but try telling that to a little one who is just having a blast with the swirling colors. At their age, they aren’t as concerned with the final result as we might be.

Inevitably, my guys discarded the brushes to do a little sidewalk finger painting.

Tried It Tuesday: Homemade Sidewalk Paint - Finger Painting


And then some body painting.

And some pour-everything-out-and-mix-it-around-with-your-hands-and-feet painting, which actually gave us some pretty cool results.

Yes, they were messy, but as I said, getting messy is part of the fun.

So far, we haven’t had any issues with the paint staining clothes, but I can’t make any promises. We did have two little boys who needed a good soak in the tub afterward, but they were two very happy little boys.

This is definitely something I can see us trying again soon.


YOU MAY ALSO LIKE:

Homemade Play-Dough

Simple Ways to Spark Joy in Your Children

How to Dye Dry Pasta

The Last Time He Called Me, “Mommy”

Tried It Tuesday: Wool Dryer Balls

Tried It Tuesday: Wool Dryer Balls

When I worked in an office, I used to get all nerdy excited when I figured out a new shortcut in a program, such as finding a quicker formula in Excel or learning how to write a new script in Filemaker. With so many things to do in a day, finding easier, more efficient ways to accomplish a task was awesome for me.

Now that I’m a stay-at-home mom, my to-do list for a day is even longer, and my excitement when I find something that helps in even a minuscule way to get something checked off that list is even greater. Instead of nerding out over program shortcuts, I’m seeking out cooking tips, how-to-entertain-your-toddler “life hacks,” creative organizing ideas, and cleaning inspirations. When they work, my super dorky happiness is kind of embarrassing.

I recently tried out a very simple laundry aid, and according to my nephew, I went “all infomercial spokesperson” on my family when I told them about how impressed I was with it.

What was it? The wool dryer ball.

If you’ve visited the land of Pinterest over the last few years and searched for anything laundry related, you most likely have seen a picture or two of what look like yarn balls that people use when they are knitting or crocheting. I’ve seen companies that sell them as well as plenty of DIY pins for making your own. I read about how putting these little wool balls into your dryer with your laundry would help dry clothes faster, prevent wrinkles, and reduce static in addition to acting as a natural, chemical-free fabric softener. (Here’s the link to the site that got me interested in giving this a try.)

Finally I remembered to add “100% wool yarn” to my shopping list, and using the weekly 40-percent off coupon from Hobby Lobby, I picked up a skein of brown & white 100-percent wool yarn for about $3. Following the site instructions, I made three cute little wool balls. (I didn’t have a crochet hook, so I just tucked the ends under other strands until it was completed covered and secure.) As soon as they were washed and dried, I was ready to test them out. And, yes, kind of excited to do so.

Tried It Tuesday: Wood Dryer BallsFrom my first load on, I have loved them.

They do, in fact, shorten my dry time. I know that one cycle is all I need no matter what’s in the load, and most of the time, I can set my dryer to a shorter cycle. The downside to that is that now if I hit the restart button when I can’t fold the clothes right away (or just don’t want to), I kind of feel guilty because I KNOW they are dry.

They also do, in fact, help with wrinkles. Hubby has a particularly annoying pair of pants that love to come out all crinkles and twisted onto themselves no matter what I do. Dryer balls to the rescue! While the pants still have wrinkles, they are far, far fewer, and much more manageable. Yea!!!

Probably the most excited I got was when I realized that they do, in fact, reduce static. With warmer weather finally here, I had one last load with sweaters and such to wash. While I do have some sweaters that I lay out to dry, there are some that can be tumbled dry on low. When I reached in to unload the dryer and didn’t hear the familiar crackle and pop of static or feel the shocks, I was shocked in a whole different way! I actually called my 5-year-old in to see how static-free the sweaters were. Seriously, I did. (He wasn’t as excited as I was.)

Something that wasn’t mentioned as a selling point, but that I will add, my boys love to help me with unloading the dryer now. (No, really. They do.) They like finding the wool balls among the clothes and tossing the balls back into the dryer. It makes a very satisfying “thunk.”

Sadly, since they are made of wool, the balls will shrink over time and eventually wear out. I opened my dryer recently to find a mound of unwound yarn where one of the balls had come apart. It might be because it wasn’t tucked in really well initially. I’m not sure. But it lasted through hundreds of laundry cycles, and the other two are still going strong, so I think it’s been worth the $3 for sure.

So, yeah. Wool dryer balls are a simple, effective aid with my laundry now. I even made some to share with my mother and mother-in-law. I love that it’s something that I don’t have to think about but that makes my life easier. I can get seriously nerdy excited about things like that.